Electric Car Charging At Home: Your Ultimate Guide
So, you’ve taken the plunge, or you’re seriously thinking about it – joining the electric vehicle revolution! Awesome move. EVs are sleek, quiet, fun to drive, and way better for the planet. But there’s one question that pops up for almost every new or potential EV owner: how do I charge this thing at home? Forget those frantic searches for public charging stations during your daily commute. Imagine waking up every single morning to a fully charged car, ready to tackle whatever the day throws at you. Sounds pretty sweet, right?
Charging your electric car at home is, hands down, one of the biggest perks of EV ownership. It’s like having your own personal gas station right in your garage or driveway, only cleaner, quieter, and way cheaper. But navigating the world of home charging – levels, plugs, installation, costs – can feel a bit like deciphering an alien language at first. Don’t sweat it! This guide is your friendly co-pilot, here to break it all down in plain English. We’ll walk you through everything you need to know to get your home charging setup humming along smoothly. Ready to power up? Let’s dive in!
Why Bother Charging Your EV at Home? The Perks!
You might be wondering, “Can’t I just rely on public chargers?” Sure, you *could*. But relying solely on public charging is like only eating out for every meal – it’s possible, but is it really the best, most convenient, or most cost effective way? Probably not. Home charging unlocks a whole new level of EV bliss. Let’s look at the big wins.
Convenience is King
Picture this: You pull into your driveway after a long day. You plug in your car. You walk inside. That’s it. No detours to find a charging station, no waiting for a spot to open up, no fiddling with apps or payment systems when you’re tired. You just plug in overnight, and *boom* – you wake up to a ‘full tank’ every morning. It seamlessly integrates into your daily routine. It doesn’t get much easier than that. This level of convenience is perhaps the single biggest reason people love charging at home. It transforms the entire EV ownership experience from something you have to actively manage to something that just… happens.
Cost Savings Galore
Let’s talk dollars and cents. Charging at home is almost always significantly cheaper than using public charging stations, especially DC fast chargers. Why? Because you’re paying residential electricity rates, which are typically much lower per kilowatt hour (kWh) than commercial rates charged at public stations. Think of it like making coffee at home versus buying it from a cafe every day. Plus, many utility companies offer special time of use (TOU) rates for EV owners. This means electricity is even cheaper during off peak hours, usually late at night when you’d be charging anyway! We’re talking potentially pennies per mile compared to gasoline or pricier public charging fees. Over the life of your car, these savings really add up.
Boosting Battery Health
Your EV’s battery is its heart, and just like our hearts, it appreciates less stress. While DC fast charging is great for road trips, frequently relying on high speed charging can put extra strain on the battery over the long term. Charging at home typically uses Level 1 or Level 2 AC charging, which is slower and gentler on your battery pack. This slower, more consistent charging can contribute to better long term battery health and longevity. Think of it as a gentle trickle charge versus a high pressure blast. Your battery will thank you for the kinder treatment!
Okay, let’s get into the nitty gritty: charging levels. You’ll hear terms like Level 1, Level 2, and Level 3 thrown around. For home charging, you really only need to focus on the first two. Level 3 is a different beast altogether.
Level 1 Charging: The Slow & Steady Tortoise
What is it? Level 1 charging uses a standard 120 volt household outlet – the same kind you plug your toaster or lamp into. Most EVs come with a portable Level 1 charging cord. You literally just plug one end into the wall and the other into your car.
Pros:
No extra cost: The charger usually comes with the car, and you don’t need any special wiring.
Simple: Plug and play. Anyone can do it.
Portable: You can take the cord with you.
Cons:
Painfully slow: This is the biggest drawback. You’ll typically only add about 3 to 5 miles of range per hour of charging. Charging a fully depleted battery could take days, not hours.
Who it’s for: Level 1 can work if you have a short daily commute (say, under 30 miles), drive a plug in hybrid (PHEV) with a smaller battery, or have ample time to charge overnight and on weekends. But for most battery electric vehicle (BEV) owners, it’s often too slow to be practical as a primary charging method.
Level 2 Charging: The Sweet Spot for Home
What is it? Level 2 charging uses a 240 volt outlet, similar to what powers an electric clothes dryer or oven. This requires dedicated installation by an electrician, either as a 240V outlet you plug a charger into, or a hardwired charging station.
Pros:
Much faster: This is the game changer. Level 2 chargers typically add 15 to 60 miles of range per hour, depending on the charger’s amperage and your car’s capabilities. This means you can easily fully charge your EV overnight, even from empty.
Practicality: It makes EV ownership seamless for most drivers, easily replenishing daily driving range in a few hours.
Future proofing: Installs infrastructure ready for current and future EVs.
Cons:
Installation cost: You need to buy the charger (unless your car came with a capable portable one) and pay an electrician for installation, which can range from a few hundred to a couple of thousand dollars.
Requires dedicated circuit: You can’t just plug it into any old outlet.
Why it’s recommended: For the vast majority of EV owners, installing a Level 2 charger at home is the way to go. The speed and convenience dramatically improve the ownership experience, making range anxiety a thing of the past for daily driving.
What About Level 3 (DC Fast Charging)?
You’ll see Level 3 chargers, also known as DC Fast Chargers (DCFC), at public stations, often along highways. These use high voltage direct current (DC) and can add hundreds of miles of range in under an hour – sometimes much less! Sounds amazing, right? So why not get one at home? Short answer: cost and power requirements. Level 3 chargers are incredibly expensive (tens of thousands of dollars) and require industrial grade electrical service that residential homes simply don’t have. They are strictly for public/commercial use and road trips, not your garage.
Choosing Your Weapon: Types of Home EV Chargers
Once you’ve decided Level 2 charging is right for you (and it probably is!), you need to pick the actual charger, often called an Electric Vehicle Supply Equipment (EVSE). There are a few variations to consider.
Portable Chargers (Often Level 1, Sometimes Level 2)
As mentioned, most EVs come with a basic Level 1 portable charger. Some manufacturers or third party vendors also offer *portable Level 2 chargers*. These look similar to Level 1 cords but have different plugs designed for 240V outlets (like NEMA 14 50 or 6 50). If you already have a 240V outlet installed (maybe for a welder or an old dryer in the garage), a portable Level 2 charger can be a cost effective option, offering Level 2 speeds without installing a wall mounted unit. They are also handy to take with you for charging opportunities away from home (like at RV parks, with the right adapter).
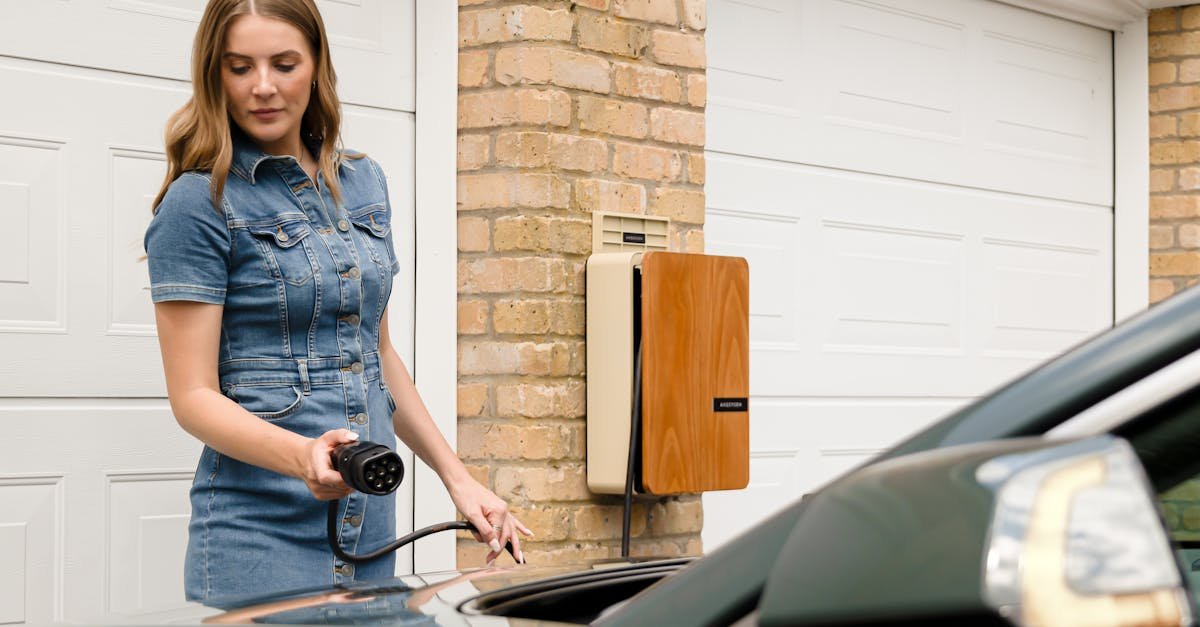
Wall-Mounted Chargers (Typically Level 2)
These are the most common type of home Level 2 chargers. They are permanently installed on a wall in your garage or driveway. They offer a cleaner look and often come with more features than portable units.
Hardwired vs. Plug-In: What’s the Difference?
Wall mounted Level 2 chargers come in two main installation types:
Plug In: The charger has a short cord with a 240V plug (like a NEMA 14 50) that goes into a corresponding outlet installed by your electrician. Pros: Potentially slightly cheaper installation if the electrician only needs to install the outlet; easier to replace the charger yourself if needed; you can take it with you if you move (just unplug it). Cons: Outlet itself adds a potential point of failure; might look slightly less streamlined.
Hardwired: The charger is wired directly into your home’s electrical circuit by the electrician, with no plug or outlet. Pros: Generally considered a more robust and permanent installation; potentially safer with fewer connection points; often required for outdoor installations or higher amperage chargers; cleaner look. Cons: Installation might be slightly more complex; replacing the unit requires an electrician; not easily portable if you move.
Which is better? It often comes down to personal preference, local electrical codes, and your electrician’s recommendation. Both provide the same charging speeds if rated for the same amperage.
Smart vs. Dumb Chargers: Brains vs. Brawn
Beyond installation type, you’ll choose between “dumb” and “smart” chargers:
Dumb Chargers: These do one job: charge your car when it’s plugged in. They are typically cheaper and simpler. If your EV already has sophisticated charging controls built in (like scheduled charging), a dumb charger might be all you need.
Smart Chargers: These connect to your home Wi Fi network and offer a range of extra features via a smartphone app. This often includes:
Remote start/stop charging
Scheduled charging (to take advantage of off peak rates)
Load balancing (if you have multiple EVs charging)
Potential integration with utility demand response programs (for extra savings)
Over the air software updates for new features
Smart chargers cost more upfront but offer greater control, insight, and potential long term savings. They are generally the recommended choice for most users wanting maximum flexibility.
The Installation Journey: Getting Your Level 2 Charger Set Up
Okay, you’ve picked your Level 2 charger. Now comes the crucial part: getting it installed safely and correctly. This is not a DIY project unless you are a qualified electrician. Messing with 240V circuits is dangerous. Here’s the typical process:
Finding a Qualified Electrician: Don’t DIY This!
Job number one is finding the right person for the job. Look for a licensed and insured electrician, ideally one with specific experience installing EV chargers. Ask friends, neighbors, local EV owner groups, or your car dealership for recommendations. Get quotes from at least two or three electricians. Ensure they understand you need a dedicated 240V circuit run from your breaker panel to your desired charging location.
The Home Assessment: Sizing Up Your Electrical System
Before providing a quote, the electrician will likely need to assess your home’s electrical system. They’ll check:
Your main electrical panel’s capacity: Older homes might have 100 amp service, while newer ones often have 200 amps or more. A Level 2 charger requires a significant amount of power (typically a 40A or 50A circuit for a 32A or 40A charger), so the electrician needs to ensure your panel has enough spare capacity. If not, you might need a panel upgrade, which adds cost.
Space in the breaker panel: They need physical space to add a new double pole breaker for the 240V circuit.
Wiring route: They’ll figure out the best path to run the new wiring from the panel to the charger location (garage, driveway, etc.). The distance and complexity of this run significantly impact the installation cost.
Permits and Paperwork: Crossing the T’s
In most areas, installing a new 240V circuit and EV charger requires an electrical permit from your local municipality. Your electrician will usually handle the permit application process, but make sure to confirm this. The permit ensures the work is done to code and inspected for safety. Don’t skip this step!
The Installation Process Explained: What to Expect
On installation day, the electrician will:
Turn off the power to your home (briefly, usually).
Install the new double pole breaker in your panel.
Run the appropriate gauge wiring from the panel to the charger location, securing it properly. This might involve drilling through walls or running conduit.
Install either the 240V outlet (for plug in chargers) or mount and hardwire the charger itself.
Test the circuit and the charger to ensure everything is working correctly and safely.
Clean up the work area.
Arrange for the final electrical inspection if required by the permit.
The whole process typically takes a few hours, depending on the complexity.
Let’s Talk Money: The Costs Involved
Alright, the inevitable question: how much is this all going to set me back? The cost of home EV charging setup breaks down into a few key areas.
Charger Hardware Costs: The Price Tag
Level 2 chargers themselves vary in price.
“Dumb” chargers: Generally range from $300 to $500.
Smart chargers: Typically cost between $500 and $800, sometimes more for premium models with advanced features.
Portable Level 2 chargers: Often fall in the $200 to $400 range.
Factors influencing price include brand reputation, amperage (higher amps usually cost more), cable length, smart features, and certifications (look for UL or ETL listing for safety).
Installation Costs: It Varies!
This is where the biggest variability lies. The cost to have an electrician install your Level 2 circuit and charger can range widely, typically from $400 to $1,500, but sometimes more. Key factors influencing this cost include:
Distance from panel to charger: Longer runs mean more wire and labor.
Panel capacity: If your panel needs upgrading to handle the load, this can add $1,000 to $3,000+ to the project.
Complexity of the wire run: Running wire through finished walls or tricky spaces costs more than a simple run through an unfinished basement or garage.
Labor rates: Electrician rates vary by location.
Permit fees: Usually a minor part of the cost, but still a factor.
Get detailed quotes that break down materials and labor.
Running Costs: Your Electricity Bill Impact
Once installed, the cost to charge your EV depends on your local electricity rates and how much you drive. You calculate it like this: (Miles driven / EV efficiency in miles/kWh) * Cost per kWh = Charging cost.
For example: Driving 1,000 miles in a month in an EV that gets 3.5 miles/kWh, with electricity costing $0.15/kWh, would cost: (1000 / 3.5) * $0.15 ≈ $42.86 for the month. Compare that to gasoline! To minimize costs, charge during off peak hours if your utility offers TOU rates. Your smart charger or EV’s app can often help schedule this automatically.
Charging Smarter, Not Harder: The Magic of Smart Charging
We touched on smart chargers earlier, but let’s appreciate their benefits a bit more. Think of a smart charger as your personal energy assistant for your car. The scheduling feature alone is worth its weight in gold if you have time of use electricity rates. You simply tell the app your utility’s off peak hours (e.g., 11 PM to 6 AM), and it ensures your car only charges during that cheaper window, saving you money automatically. No need to run out in your pajamas to plug in at the right time!
Energy monitoring lets you see exactly how much electricity your car is using and how much it’s costing you – great for budgeting and understanding your energy consumption. Remote control means you can start or stop a charging session from your couch or even while you’re away from home. Some advanced smart chargers can even participate in utility demand response programs, where the utility might briefly pause your charging during peak grid demand in exchange for bill credits or other incentives. It’s all about giving you more control, visibility, and potential savings.
Can You Get Help Paying for This? Incentives & Rebates
Good news! The upfront cost of buying and installing a home charger can often be offset by various incentives. These change frequently and vary significantly by location, so you’ll need to do some digging specific to where you live, but here’s what to look for:
Federal Tax Credits: Historically, there has been a federal tax credit for the purchase and installation of EV charging equipment. Check current IRS guidelines (Form 8911) or resources like the Department of Energy’s Alternative Fuels Data Center (AFDC) for the latest info.
State Rebates/Credits: Many states offer their own tax credits or direct rebates for charger purchase and/or installation.
Local Utility Rebates: Your electric utility company is often a great source of incentives. They might offer rebates on specific smart charger models or provide bill credits for installation. They *really* want you charging off peak!
Municipal Programs: Some cities or counties have their own local programs.
Do your research *before* you buy and install! Search online for “[Your State/City/Utility] EV charger rebate” to find current offers. These incentives can significantly reduce the overall cost.
Safety First! Keeping Your Home Charging Safe
Charging an EV involves significant electrical power, so safety is paramount. Don’t cut corners here.
Use Certified Equipment: Only buy chargers that are safety certified by a recognized testing laboratory, like UL (Underwriters Laboratories) or ETL (Intertek). This ensures they meet rigorous safety standards. Avoid cheap, uncertified chargers from unknown brands.
Professional Installation is Key: As we’ve stressed, hire a qualified, licensed electrician for Level 2 installation. Proper wiring, grounding, and breaker sizing are critical to prevent fire hazards and ensure safe operation.
Weather Protection: If your charger is installed outdoors, ensure it has an appropriate NEMA rating for weather resistance (e.g., NEMA 3R or NEMA 4). Protect the plug and connector from rain and snow when not in use.
Cable Management: Keep the charging cable tidy and off the ground to prevent tripping hazards and damage to the cable. Many chargers come with built in cable wraps or holsters.
Regular Checks: Periodically inspect the charger, cable, and connector for any signs of damage or wear. If you notice anything concerning, stop using it and contact the manufacturer or an electrician.
Troubleshooting Common Home Charging Hiccups
While generally reliable, you might occasionally encounter a glitch. Here are a few common issues and potential fixes:
Charger Won’t Start Charging:
Is it firmly plugged into both the car and the wall (or is the hardwired connection secure)?
Did a breaker trip? Check your main panel for the charger’s breaker.
Is there a scheduled charging setting active (on the charger app or in the car) preventing it from starting immediately?
Is there a fault light on the charger? Check the manual or app for error codes.
Try rebooting the charger (turn off its breaker for a minute, then back on).
Charging Slower Than Expected:
Check the charger’s amperage setting (some smart chargers allow you to adjust this).
Is your car limiting the charging speed (check vehicle settings)?
Are other large appliances running, potentially causing voltage drop (less likely with a dedicated circuit, but possible)?
Extreme temperatures (very hot or very cold) can sometimes cause the car or charger to reduce charging speed to protect the battery.
Tripped Breaker:
If the breaker trips repeatedly, stop using the charger immediately. There could be a fault in the charger, the wiring, or the car’s charging system. Call your electrician to diagnose the issue. Do not simply keep resetting a frequently tripping breaker.
When in doubt, consult your charger’s manual or contact customer support. For wiring or breaker issues, always call your electrician.
The Road Ahead: Future Trends in Home EV Charging
Home EV charging technology is constantly evolving. What’s on the horizon?
Vehicle to Grid (V2G) / Vehicle to Home (V2H): Imagine your EV not just drawing power from your home, but also *supplying* power back during peak demand or outages! V2G/V2H technology turns your car battery into a mobile power source. It’s still emerging but holds huge potential for grid stability and home backup power.
Wireless EV Charging: Just park over a charging pad, and your car starts charging automatically – no cables needed! While still niche and less efficient than wired charging today, wireless tech is improving and could become more common for ultimate convenience.
Smarter Integration: Expect tighter integration between smart chargers, home energy management systems, solar panels, and battery storage. Your charger will optimize charging based on solar production, grid prices, and your driving needs automatically.
Higher Power Levels: While Level 2 is the standard now, we might see slightly higher power AC charging options become more common at home as battery sizes increase, further reducing charge times.
The future of home charging is about more convenience, intelligence, and integration with our broader energy ecosystem.
Conclusion: Power Up Your EV Journey at Home
Making the switch to an electric vehicle is an exciting step, and setting up home charging is arguably the most important part of ensuring a smooth and enjoyable experience. It transforms range anxiety into range confidence, saves you time and money, and is gentler on your car’s battery. While the initial setup involves some decisions – choosing between Level 1 and Level 2, selecting a charger type, navigating installation – the long term benefits are undeniable. Waking up every day to a fully charged car, ready for adventure, is a convenience you’ll quickly wonder how you ever lived without. By understanding the options, planning the installation carefully, and taking advantage of potential incentives, you can easily create a home charging setup that perfectly fits your needs and budget. Welcome to the effortless world of home EV charging – your personal fuel station awaits!
Frequently Asked Questions (FAQs)
1. Will installing an EV charger increase my home’s value?
It definitely can! As EVs become more popular, having a dedicated Level 2 charger installed is increasingly seen as a desirable feature by homebuyers. It signals that the home is modern and future ready. While it might not add dollar for dollar value like a kitchen remodel, it can certainly make your home more attractive to potential buyers, especially in areas with high EV adoption.
2. I live in an apartment or condo. Can I still install a home charger?
This can be more challenging but is often possible. It depends heavily on your building’s policies, parking situation (assigned spots?), and existing electrical infrastructure. You’ll likely need approval from your landlord or homeowner association (HOA). Some states have “right to charge” laws that make it harder for landlords/HOAs to deny reasonable requests. You may need to cover installation costs, and the logistics can be complex (running wires through common areas). Start by talking to your property management or HOA board.
3. What if we have two EVs? Can we charge them both at home?
Yes! You have a couple of options. You could install two separate Level 2 chargers, each on its own circuit (if your panel has capacity). Alternatively, some smart chargers offer load sharing or load balancing features. This allows two chargers to share a single circuit, intelligently splitting the available power between them. For example, if two cars are plugged in, they might each charge at half speed; when one finishes, the other gets the full power. This can avoid costly panel upgrades.
4. How long does a home EV charger typically last?
A good quality, certified home EV charger should last for many years, often 10 years or more, with proper installation and care. They are generally robust devices with few moving parts. Most reputable manufacturers offer warranties ranging from 1 to 3 years. Look for chargers built with durable materials, especially if installing outdoors.
5. Are all home chargers compatible with all electric cars?
In North America, virtually all electric cars and home Level 1 / Level 2 chargers use the same standard connector, called the J1772 plug (except Teslas, which use a proprietary plug but come with a J1772 adapter). So, yes, any J1772 charger will physically plug into any non Tesla EV, and Teslas can use them with their adapter. The main compatibility factor is the charging speed – the car will only accept power up to its maximum AC charging rate, even if the charger can supply more.